Kubernetes networking
Kubernetes networking refers to the way in which networking is configured and managed in a Kubernetes cluster. In a Kubernetes cluster, there are multiple nodes that run containers, and these containers need to communicate with each other in order to function properly. Kubernetes networking is responsible for providing a communication network between these containers.
Kubernetes networking is based on a model of service discovery and load balancing. Kubernetes uses a Service abstraction to represent a set of pods that provide the same functionality. When a client needs to access a service, Kubernetes routes the traffic to one of the pods that provide the service. This routing is done using a load balancer that distributes traffic across the pods.
Kubernetes also provides several networking plugins that can be used to implement different networking models. These plugins include Flannel, Calico, Weave Net, and others. These plugins provide different features and capabilities, such as support for different network topologies, network policies, and security features.
Kubernetes service
Kubernetes service is an abstraction layer that provides a stable IP address and DNS name for a set of pods (a group of one or more containers) in a deployment. Services enable inter-pod communication within a cluster and provide load balancing and failover capabilities.
A Service defines a logical set of Pods and a policy for accessing them. It acts as a single access point to the group of Pods that it represents, and load balances traffic across them. When a client sends a request to a Service, the request is automatically directed to one of the available Pods that belong to that Service.
A Kubernetes service can be created by defining a YAML manifest file that describes the service. The manifest file includes the service name, the type of service (ClusterIP, NodePort, or LoadBalancer), and the selector that identifies the set of pods to be targeted by the service.
There are three types of Kubernetes services:
ClusterIP:

This is the default service type that exposes the service on a cluster-internal IP by making the service only reachable within the cluster.
The ClusterIP provides a load-balanced IP address. One or more pods that match a label selector can forward traffic to the IP address. The ClusterIP service must define one or more ports to listen on with target ports to forward TCP/UDP traffic to containers.
A Cluster service is the default Kubernetes service. It gives you a service inside your cluster that other apps inside your cluster can access.
There is no external process.
You can use ClusterIP for debugging your services, or connecting to them directly from your laptop for some reason.Allowing internal traffic, displaying internal dashboards, etc.
NodePort:

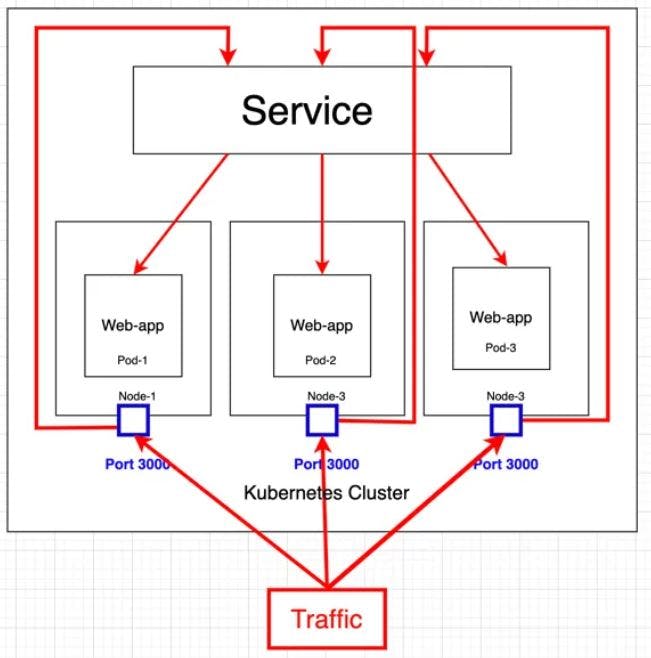
This type of service provides a static port on each node in the cluster that is mapped to a port on the service. It is used to expose a service externally, outside of the cluster.
This exposes the service on each Node’s IP at a static port. Since a ClusterIP service, to which the NodePort service will route, is automatically created. We can contact the NodePort service outside the cluster.
NodePort, as the same implies, opens a specific port on all the Nodes (the VMs), and any traffic that is sent to this port is forwarded to the service
You can use NodePort in the following scenarios:
There are many downsides to this method
You can only have one service per port
You can only use ports 30,000-32,767
If your Node/VM IP address change, you need to deal with that
LoadBalancer:

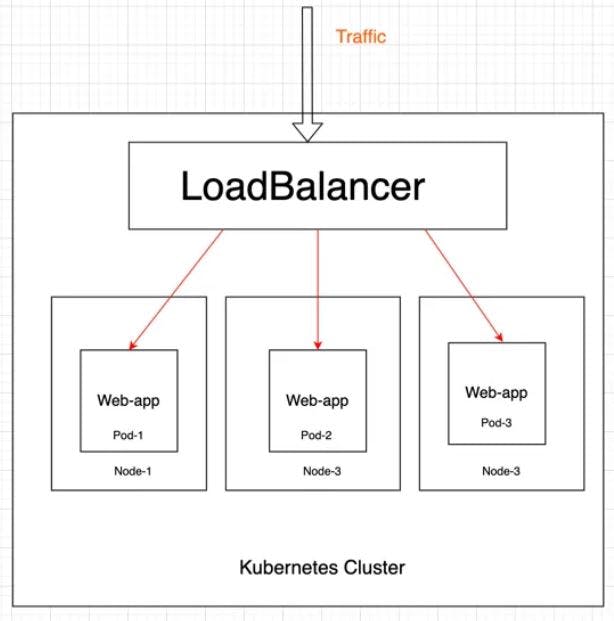
This type of service provides a load balancer for the service that can be accessed externally. It is typically used in cloud environments where the cloud provider offers a load balancer service.
The LoadBalancer service type works in conjunction with cloud providers' load balancer services, such as AWS ELB or Google Cloud Load Balancer, to provide a scalable and highly available way of exposing services externally. When you create a LoadBalancer service, Kubernetes automatically creates a load balancer on the cloud provider's infrastructure and assigns it a public IP address.
You can use LoadBalancer in the following scenarios:
All traffic on the port we specify will be forwarded to the Service. There is no filtering, no routing, etc.
The big downside of it is that it is usually only available on a Cloud environment where We have to pay to allocate a Load Balancer for your Service.
Once a service is created, it can be accessed using its DNS name or IP address. Any traffic sent to the service will be load balanced to the pods that are targeted by the service selector.
Ingress
Ingress is a Kubernetes resource that provides a way to route incoming HTTP and HTTPS traffic to different services based on the request's host or path. In other words, it allows you to expose multiple services under a single IP address by providing a way to route traffic to the appropriate backend service based on the request.
To use Ingress in Kubernetes, you first need to have a running Kubernetes cluster with Ingress controller deployed. An Ingress controller is a component that is responsible for implementing the Ingress rules by configuring a proxy server, such as NGINX or Traefik, to route traffic to the correct services.
Once you have an Ingress controller deployed, you can create an Ingress resource to define the routing rules. The Ingress resource specifies the hostname, path, and service to which traffic should be directed. You can also define additional rules for redirecting, SSL/TLS termination, and other advanced routing configurations.
apiVersion: networking.k8s.io/v1
kind: Ingress
metadata:
  name: sample-ingress
spec:
  rules:
  - host: sample.com
    http:
      paths:
      - path: /app1
        pathType: Prefix
        backend:
          service:
            name: app1-service
            port:
              name: http
      - path: /app2
        pathType: Prefix
        backend:
          service:
            name: app2-service
            port:
              name: http
This Ingress resource defines two paths /app1 and /app2, both of which are served by different services app1-service and app2-service. The host field specifies that this rule applies only to requests coming to sample.com. The pathType field specifies whether the matching should be exact or a prefix.
Network Policies
Network Policies in Kubernetes allow you to define rules for traffic flow between pods and external traffic. Network policies are a way to enforce security rules that restrict communication between pods or namespaces, which can help to improve the security and compliance of your Kubernetes cluster.
Network policies are implemented using the Kubernetes NetworkPolicy resource, which defines a set of rules that specify how traffic is allowed to flow between pods. A network policy consists of a set of pod selectors, along with a set of ingress and egress rules that define the traffic flow.
apiVersion: networking.k8s.io/v1
kind: NetworkPolicy
metadata:
  name: sample-policy
spec:
  podSelector:
    matchLabels:
      app: test-app
  policyTypes:
  - Ingress
  ingress:
  - from:
    - podSelector:
        matchLabels:
          app: samle-app
    ports:
    - protocol: TCP
      port: 80
This definition creates a NetworkPolicy named sample-policy that applies to pods with the label app=test-app. It allows ingress traffic from pods with the label app=sample-app on port 80. Any other ingress traffic is blocked by default.
Domain Name System (DNS)
DNS stands for Domain Name System. It is a system for giving different types of information with unique easy to remember names.
DNS is used to resolve service names to their corresponding IP addresses within the cluster. When a pod needs to communicate with a service, it can use the service name as a hostname and the Kubernetes DNS resolver will return the IP address of the service.
This allows pods to communicate with each other using the service name, rather than requiring them to know the IP addresses of individual pods.
we can set up a DNS system with two well-supported add-ons namely CoreDNS and KubeDNS. The CoreDNS feature is one of the best and latest add on and it acts as a default DNS server. Both the add-ons can schedule a DNS pod or pods or services with a static IO on the cluster and both are named as kube dns in the metadata. name field.
Container Networking Interface (CNI)Plugins
In Kubernetes, CNI (Container Networking Interface) plugins are used to provide networking capabilities to pods. When a pod is created, Kubernetes delegates the networking responsibilities to a CNI plugin, which is responsible for setting up the network interfaces, IP address allocation, and traffic routing for the pod.
Kubernetes includes a default CNI plugin called
kubelet, which is responsible for managing the networking for pods in the cluster. Thekubeletplugin is typically used in conjunction with a network overlay solution, such as Flannel or Calico, to provide network connectivity between pods in different nodes of the cluster.Some popular CNI plugins used in Kubernetes include:
Flannel - a simple and easy-to-use CNI plugin that provides a network overlay for Kubernetes clusters.
Calico - a CNI plugin that provides advanced network policies and security features for Kubernetes clusters.
Weave Net - a CNI plugin that provides a mesh network overlay for Kubernetes clusters.
Cilium - a CNI plugin that provides advanced network policies and deep visibility into container traffic in Kubernetes clusters.
To use a third-party CNI plugin in Kubernetes, you need to install the plugin on each node in the cluster and configure the
kubeletto use the plugin as the CNI provider.
Thank you Shubham Londhe for KubeWeek challenge. This inspires all learners to showcase their learning and improve their knowledge.
#devops #kubeweek #kubernetes #kubeweekchallenge #trainwithshubham
Thank You!!
